Booting the CD
Verify the CD's Contents
Before rebooting your computer, it is advisable to check to make sure the WISP CD was properly burned. If you have AutoRun enabled (which most Windows computers do), simply insert the CD into the computer. After a moment, your default web browser will appear displaying a message telling you that you must reboot your computer to use WISP. If this happens, you may close the browser window and boot the WISP CD..
If the browser window does not appear, either you have AutoRun disabled or the CD was not burned properly. To determine this, open My Computer and then open the CD drive in which you have inserted the CD. Once you do so, you will either see the aforementioned browser window or you will see a Windows Explorer window showing you the contents of the WISP CD, such as this one:
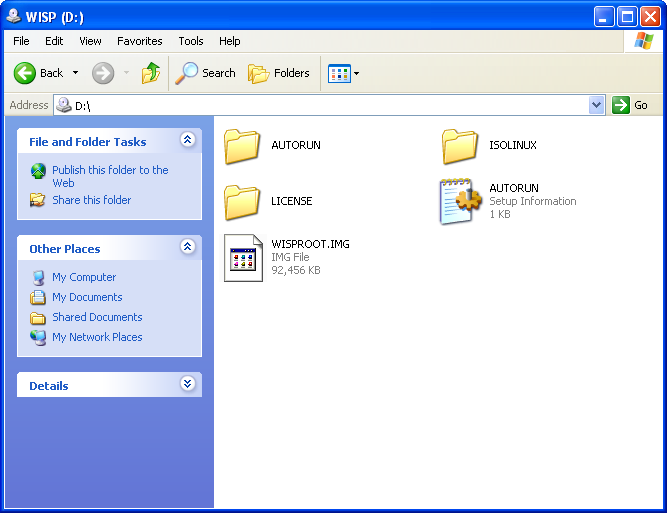
Take careful note of the filenames pictured above. If your computer shows all of these filenames, the CD was burned properly. If it does not show at least most of the above filenames, it was not. If your CD was not burned properly, you may wish to refer to the instructions on the Burning the CD page.
Otherwise, you now have a WISP CD!
Boot the WISP CD
 |
Potential Pitfall | |
Note that to use WISP, you must reboot your computer and boot from the CD instead of booting from your hard disk where Windows is stored. When you do this, your Windows desktop will be unavailable; you will not be able to view this webpage or use any of your Windows applications until you boot back into Windows.
For this reason, it is recommended that you read through the next several pages of instructions in order to know what to expect when you reboot your computer. You may wish to take notes on some of the content, print several of the pages or, if you have a second computer available, view this website on that computer while you reboot the first computer using the WISP CD.
You are now ready to reboot your computer and use WISP. Insert the WISP CD into your drive and reboot. It is important that you shut down properly; that is, shut down by opening the Start Menu and selecting "Restart" or "Shut Down". If you shut down your computer improperly (by, for example, pressing the reset button or power switch on your computer's case), WISP may be unable to create an image of your Windows installation until you have booted back into Windows and shut down properly again.
|
Potential Pitfall | |
Many computers are manufactured with default settings in the BIOS that instruct the computer to try to boot from the hard disk first and, if that fails, then try to boot from the CD drive. If this is the case for your computer, the WISP CD may not boot; instead, you will see Windows boot again. To solve this problem, you can either change that setting in your BIOS (allowing the computer to boot from CD) or select CD from the boot menu feature many such BIOSes have.
To use the boot menu, observe your BIOS screen carefully during bootup. A message will appear somewhere on the screen indicating the key to press to get a boot menu.

As the computer is booting, press that key. (It does not hurt to press the key multiple times; if you wish, you may press the key continuously from power-on until you reach the boot menu to ensure that you do not miss the opportunity.) Your BIOS may display a message, usually at the bottom of the screen, indicating that it has received your request and will be entering the boot menu. Once your boot menu appears, select your CD drive and WISP will boot.
Once the WISP CD has booted, you will see the following screen.

Press enter and WISP will load.
|
Potential Pitfall | |
There are a few conditions which may cause WISP to fail to load. The WISP CD may be damaged (if, for instance, it has been scratched), preventing WISP from accessing files it needs. It is also possible that your computer does not have sufficient RAM to load WISP; since you may want to use your CD drive to burn a WISP recovery CD, WISP must load entirely into RAM and so needs a fair amount to be available.
If WISP fails to load because the CD is damaged, you will eventually see a message like the following:

The solution to this problem is to burn a new WISP CD and try again.
If WISP fails to load because your computer does not have enough RAM, a message similar to the following will be displayed:

Unfortunately, the only solution to this problem is to increase the amount of RAM in the computer by installing a new memory module (also known as a "RAM stick"). This may or may not be worth doing if your only use for it will be to run WISP, although it is likely to significantly increase the performance of your computer if you are running Windows XP or a newer OS.
Once WISP has loaded, you will see the following introduction screen or one like it.

You are now ready to proceed to the next step!
Content copyright Zachary Palmer 2007. All rights reserved.
This page is ad-free. If you see an advertisement on this page, please contact me at zep01@bahj.com.


