Creating an Image
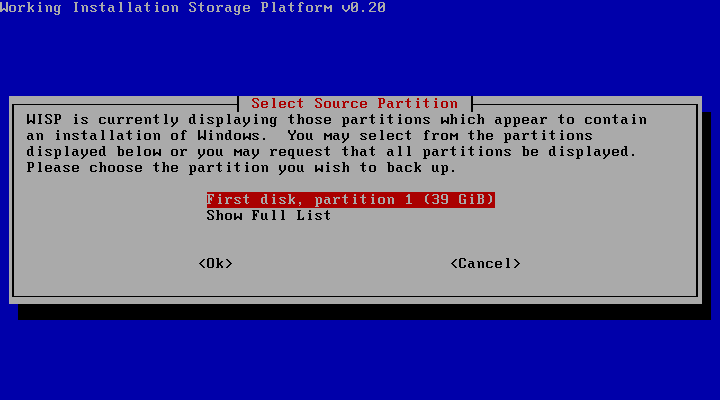
Select Source Partition
After selecting "Create" from the introduction screen, WISP will analyze the storage devices on your computer. Afterward, you will be asked to select the hard disk partition on which Windows is stored. WISP will present a list of partitions which appear to contain Windows installations and ask you to select from them. Typically, you will only have one installation of Windows on your computer, so there will only be one partition displayed such as is the case below.
 |
Potential Pitfall | |
If you did not shut down Windows properly, you may see a screen similar to the following one.
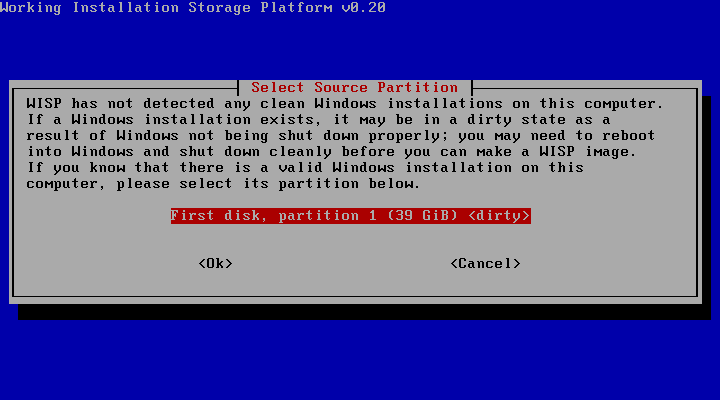
This is a result of two cases: either Windows does not appear to be installed on the computer in question, or (more likely) the Windows partition is not clean. A dirty Windows partition is a result of Windows being shut down improperly. Usually, Windows itself will clean these partitions when it reboots, but WISP is unable to do that. To fix this problem, you will need to reboot into Windows, shut down using the Start menu, and then start WISP again.
The following screen will ask if you wish to copy your current bootloader into the WISP image.
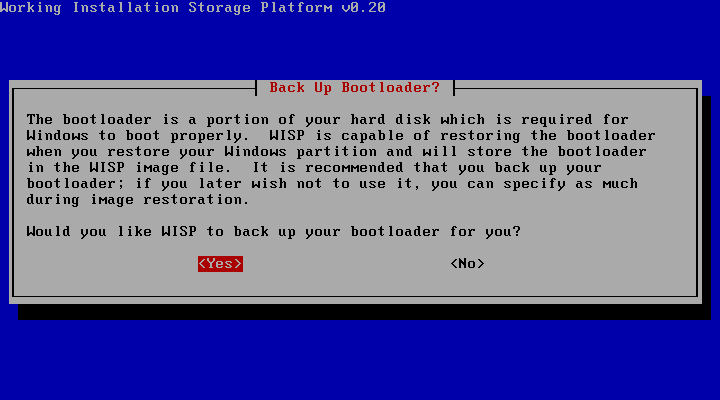
Your bootloader is used early during the boot process to start the loading of your operating system. To make sure that Windows can boot when you restore this image, you will need to have some kind of bootloader in place. Unless you have a specific reason why you don't want to use your current bootloader, answering "yes" to this question is recommended.
Select Target Media
WISP will now present you with the following dialog, asking you what kind of media you would like to use to store the image:
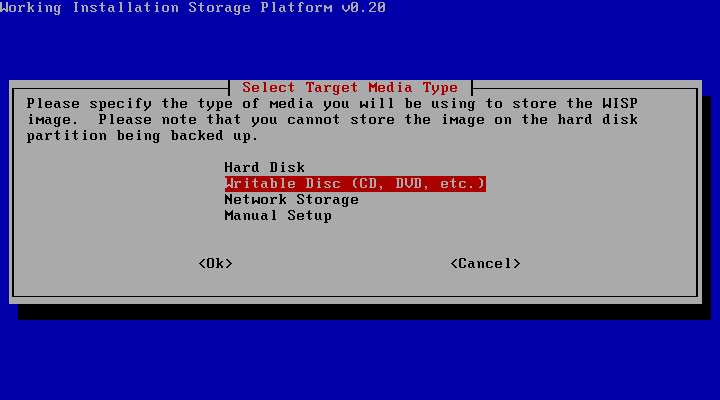
This page contains examples of each of these procedures. Your options are:
- Hard Disk: Create an image which is stored on another partition or drive.
- Writable Disc: Create an image which is stored on a CD, DVD, or other optical media.
- Network Storage: Create an image which is stored on another computer on your network.
- Manual Setup: Create an image which is stored on a device which you set up yourself.
Please select one of the above options to jump to the instructions for that section.
Writing to Hard Disk
After selecting "Hard Disk" as your storage type, you will be prompted as below to identify on which partition you would like to store the WISP image file.
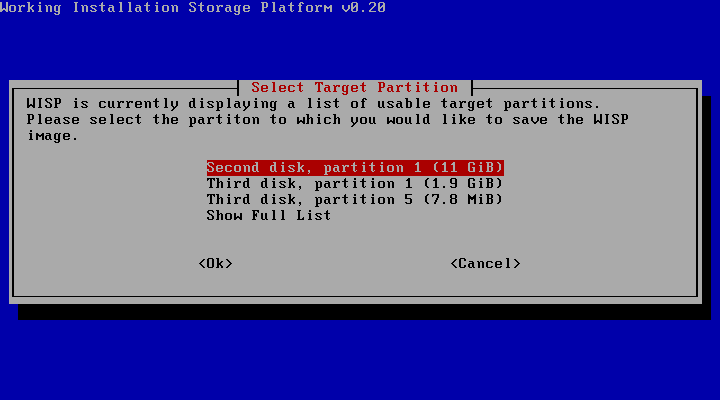
Please select the partition on which you wish to store the WISP image. If later you change your mind, you may press escape while selecting a location for the new file and return to this dialog.
|
Potential Pitfall | |
You cannot store the WISP image to the partition on which Windows is installed; this is because part of the reason that WISP requires you to reboot is to make sure that nothing on the Windows partition is changing. As a result, if you only have one partition (just C drive) and no other hard disks in your machine, you may receive the following message.
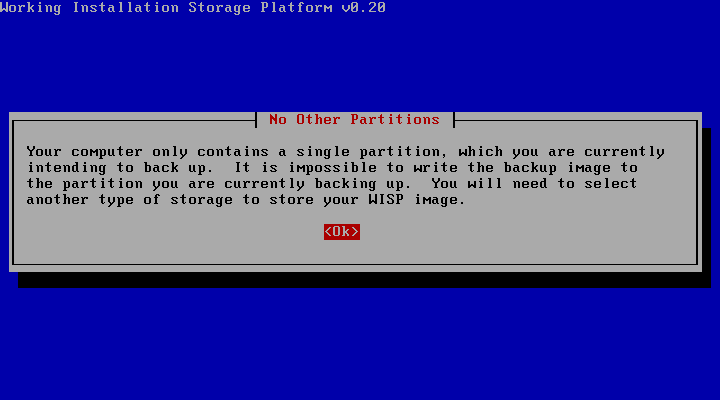
If this is the case, the only recourse is to select a different target media type.
Next, WISP will ask you to locate the place on the partition you selected that you would like to save the image file.
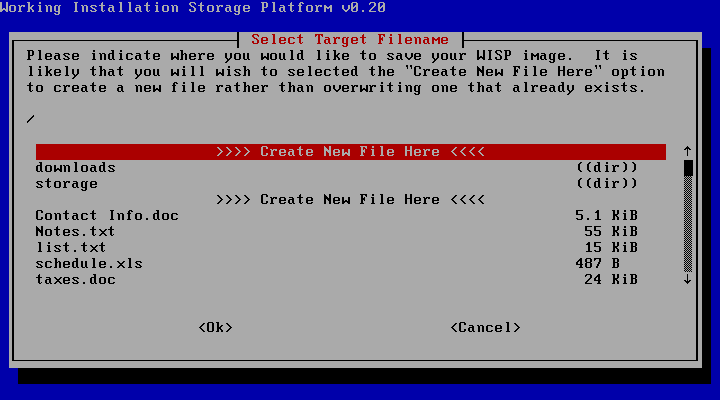
You may navigate the partition by selecting folders you wish to view. To step out of a folder you are currently viewing, select the folder entry named "..". Folders are marked with the tag "((dir))" whereas files are marked with their size.
Once you have found the folder in which you wish to store the image file, select a "Create New File Here" entry and the following dialog will appear.
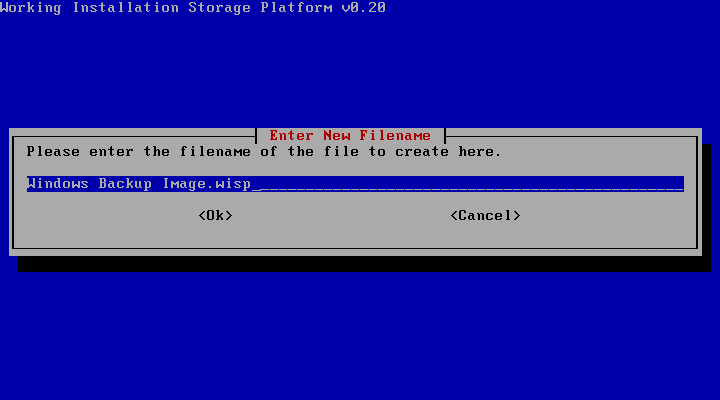
You may enter the filename you wish to use for the WISP image or leave this dialog as it is to use the default filename.
You have now described to WISP how you wish to store the image file. Click here to finish instructing WISP and begin the image creation.
Burning to Optical Media
After selecting "Writable Disc" as your media type, you will be prompted to select the optical disc writer you wish to use, such as is the case below.
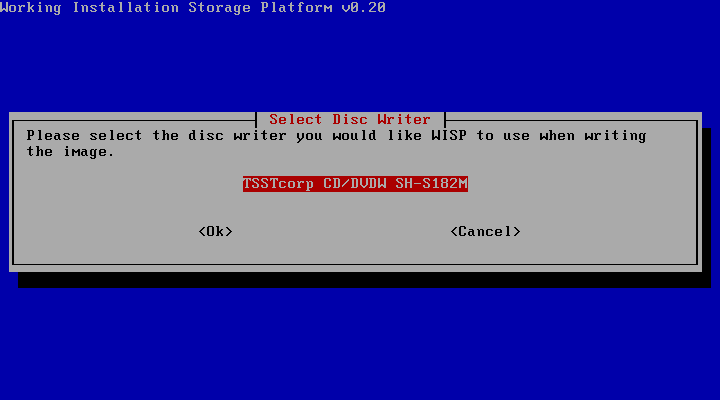
You will be prompted later to insert a writable disc, but you may choose to do so at any time after the main WISP menu appears. Please note that you may need several writable discs depending upon the amount of data stored on your Windows partition. You may use multiple different kinds of optical media (CD-RW, DVD+R, etc.) in the same image set; WISP will simply fill each disc to capacity until it has written enough data to represent the image.
This is the only step involved in telling WISP to write to optical media. Please click here to finish instructing WISP and begin the image creation.
Writing to a Networked Computer
It is possible for WISP to use a network connection to access storage on a remote computer and save the WISP image you are creating there. This example will cover using Windows shares (SMB), but it is also possible to use an SSH server if you have one available. The network type selection screen is depicted below.
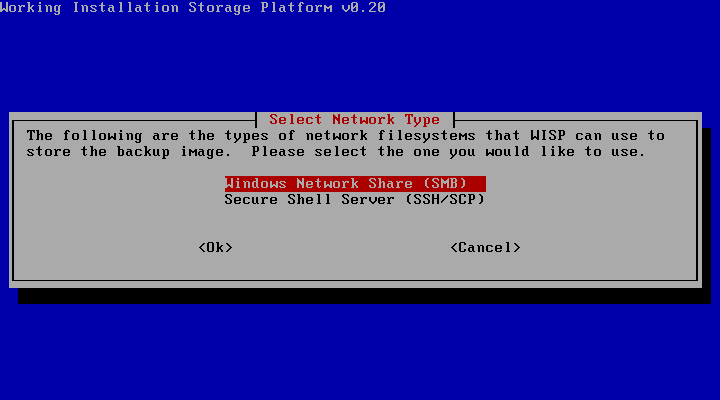
After selecting "Windows Network Share", the following dialog will appear asking you for the SMB path to the share you wish to use.
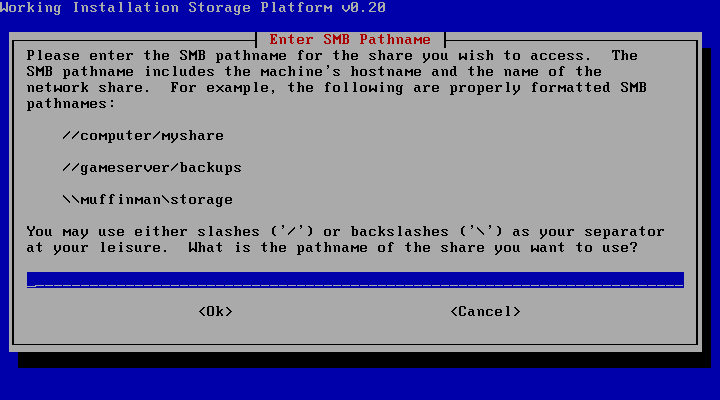
You will need to provide the path to your SMB share. An SMB share's path is written as "\hostname\share". The hostname can be either the computer's IP address (such as 192.168.1.2) or the computer's name (such as Antelope or FamilyComp). The share itself is the name of the share as it was set up on the computer in question.
Note that WISP is not asking for a path beyond the sharename. Do not specify a subfolder to the shared folder, such as "\192.168.1.2\datashare ewstuff\wisp\"; you will be given an opportunity to browse the share's contents later.
Once you have provided the SMB share's path, WISP will ask you for your username:
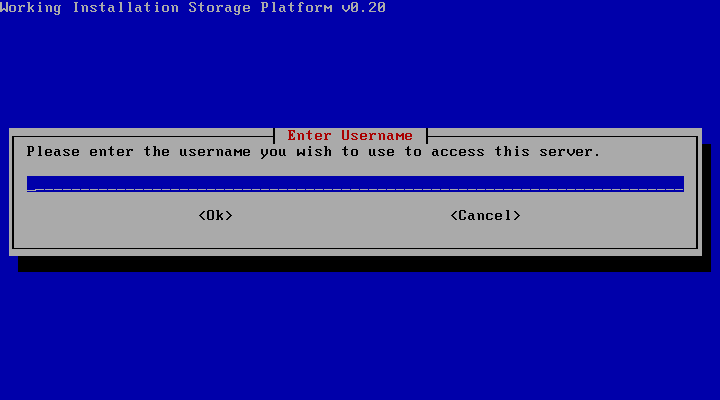
This should be the username you would use to connect to the share in question. Once you have provided that, you will be prompted for your password at the very bottom of the screen.
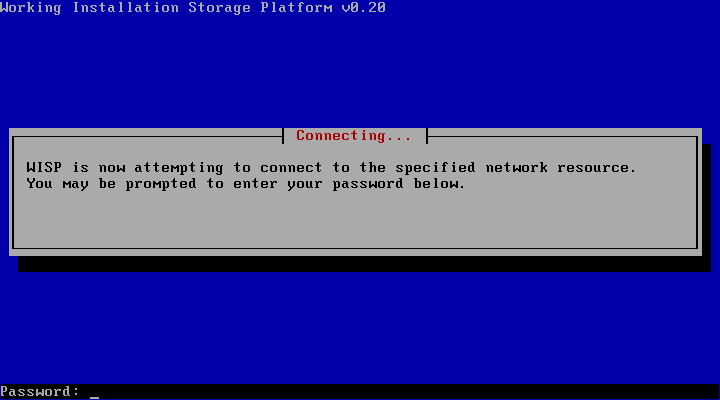
In order to protect your password, it will not be displayed on the screen in any form (not even as a series of asterisk characters, such as "*********"). If you make a mistake while typing your password, press backspace many times (at least once for each character in the password) and then try again.
WISP will then attempt to connect to the SMB server to permit you to store a WISP image file. If your password was correct and WISP successfully authenticates you, you will be prompted to select a location for the new WISP image file as below.
You may navigate the share by selecting folders you wish to view. To step out of a folder you are currently viewing, select the folder entry named "..". Folders are marked with the tag "((dir))" whereas files are marked with their size.
Once you have found the folder in which you wish to store the image file, select a "Create New File Here" entry and the following dialog will appear.
You may enter the filename you wish to use for the WISP image or leave this dialog as it is to use the default filename.
You have now described to WISP how you wish to store the image file. Click here to finish instructing WISP and begin the image creation.
Manually Preparing Target Media
In the event that none of the above methods are acceptable, WISP provides a manual target setup option. If you select "Manual" from the target media menu, WISP will provide you with a bash shell to allow you to execute a series of commands in order to prepare the media yourself. The bash shell is nothing like the Windows command prompt and does not accept the same commands; only use manual setup if you need to do so and if you are already familiar with bash and Linux.

Once you have finished setting up the target media, press Ctrl-D to log out of the shell and allow WISP to continue.
Select Compression Type and Confirm Details
After you have configured the target for your WISP image file, you will be presented with this dialog.
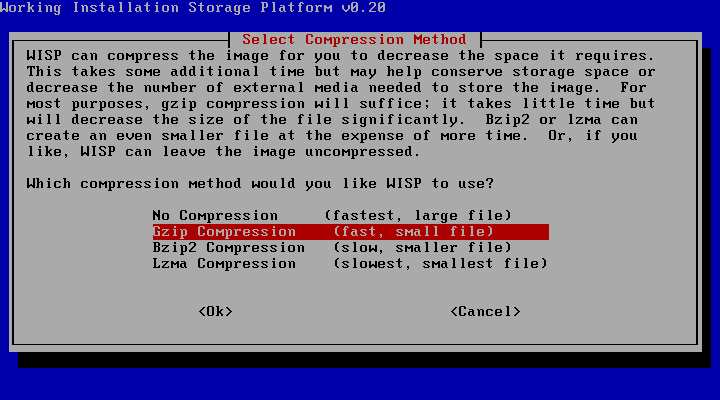
WISP is capable of compressing the data in the image file to reduce the amount of storage space you need to save it. This takes a bit more time, however, so you are given the option of several compression methods. The compression methods are faster as they near the top of the list and more effective as they near the bottom.
To better illustrate the differences between these compression methods, consider the test results in the following table which were obtained by creating several WISP images of a new Windows installation.
| Compression Method | Size Factor * | Time Factor * |
|---|---|---|
| None | 100.0% | 1.0x |
| Gzip | 42.2% | 1.55x |
| Bzip2 | 41.7% | 3.76x |
| Lzma | 35.9% | 8.50x |
As you can see, the smaller the file gets, the longer it takes to compress it. Usually, gzip compression is suitable for most users; it adds little overhead in terms of time and yet produces a significant reduction in the size of the image. If, however, you need the image to be as small as possible, LZMA compression is most likely your best choice.
Once you have selected your compression mechanism, you will see the following confirmation dialog or one like it. Note that the information presented here may vary depending upon which options you chose and how your computer is configured.
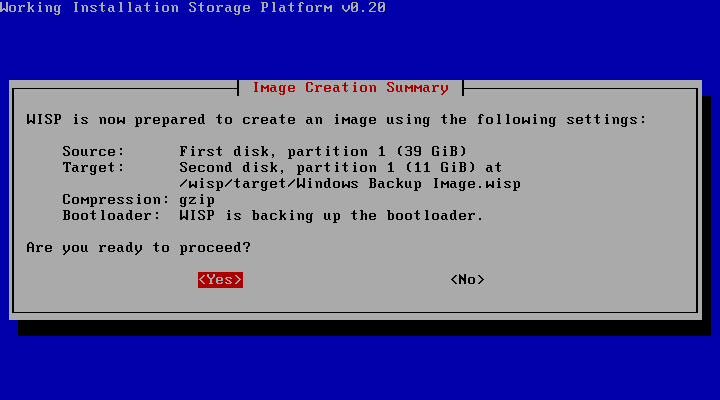
Once you press OK to acknowledge this dialog, WISP will begin creating the image. You will be provided with a progress dialog such as the following.
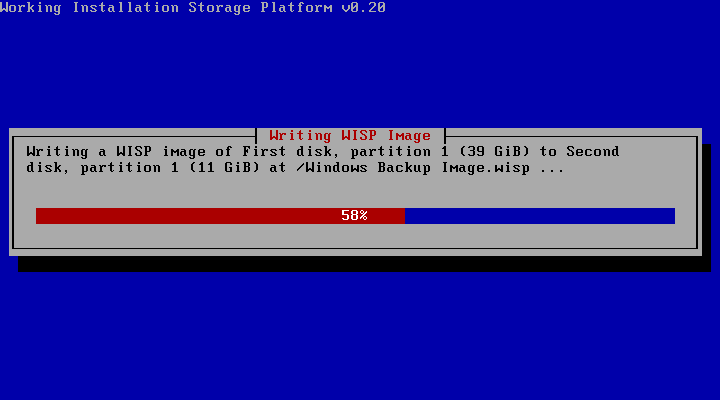
If you are using optical media to write the WISP image, you may occasionally be prompted to provide another writable disc; this will happen if your WISP image is large enough that it cannot fit on one disc. It is also important to note that WISP must finish writing the entire disc before it can finish with it, so it will take WISP just as long to write the last disc as it took to write the other discs in the set.

If you see the above dialog, you're finished! You may reboot your computer and use Windows normally. Keep the WISP image stored in a safe location. If and when Windows is damaged, you can boot into WISP again and follow the instructions on the next page to restore it.
Content copyright Zachary Palmer 2007. All rights reserved.
This page is ad-free. If you see an advertisement on this page, please contact me at zep01@bahj.com.


