Restoring an Image
Starting Restoration
In order to begin restoring the WISP image you have created, you will need to have booted WISP. If you are not currently running WISP, please follow the instructions on the Booting the CD page.
When WISP has booted, you will be presented with the welcome screen. Select "Restore" from the welcome screen's main menu and, after WISP analyzes your storage devices, you will see the following menu.
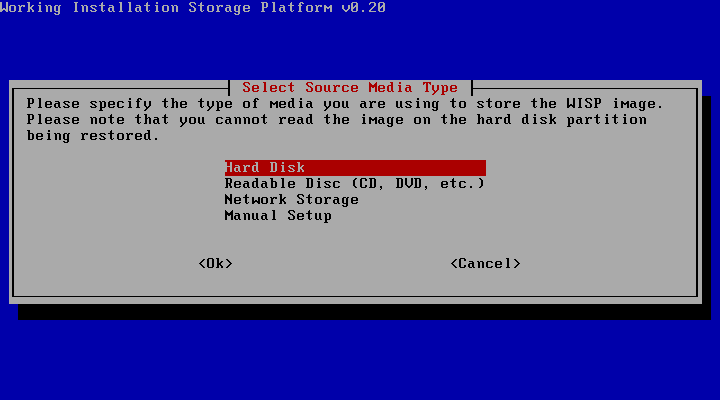
This menu parallels the target media type selection screen when creating an image. You should select the media type on which your WISP image is stored. You may click on one of the list items below to obtain instructions for each of the media types.
- Hard Disk: Restore an image from another partition or drive.
- Readable Disc: Restore an image which is stored on a CD, DVD, or other optical media.
- Network Storage: Restore an image which is stored on another computer on your network.
- Manual Setup: Restore an image which is stored on a device which you set up yourself.
Restoring from Hard Disk
After selecting "Hard Disk" as your source media type, you will be prompted to select the partition on which your WISP image is stored. A dialog such as the following one will appear.
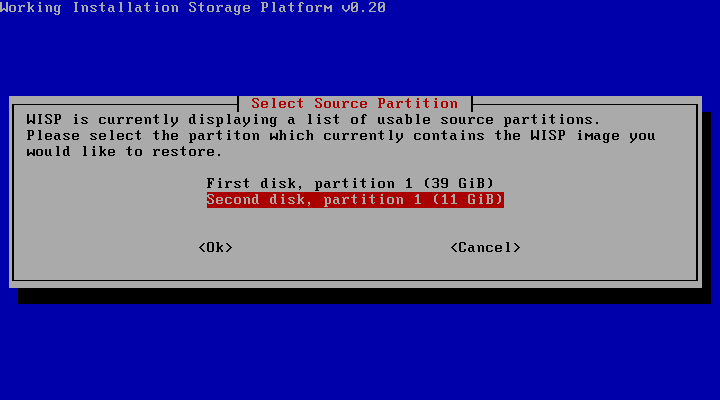
If you are not sure on which partition the WISP image is stored, you may select a partition and explore it in the next step; pressing escape will return you to this menu, where you can select another partition instead.
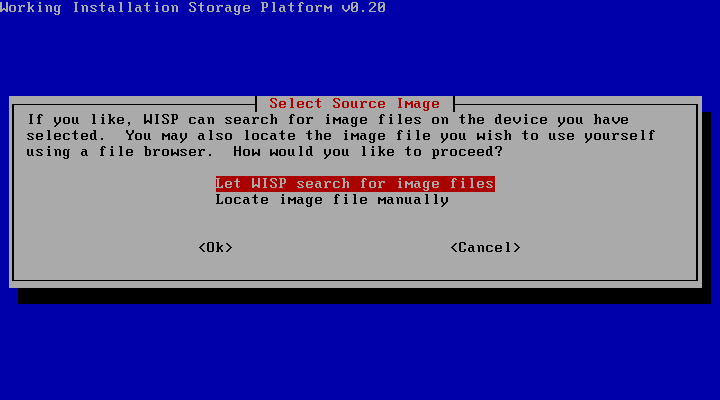
You will then be asked whether or not you wish WISP to search for WISP image files. If you wish to locate the file yourself, you will be presented with a file chooser dialog similar to the one shown on the Create an Image page under the Writing to Hard Disk section. If you allow WISP to search for files, you will see a dialog similar to the one pictured below:
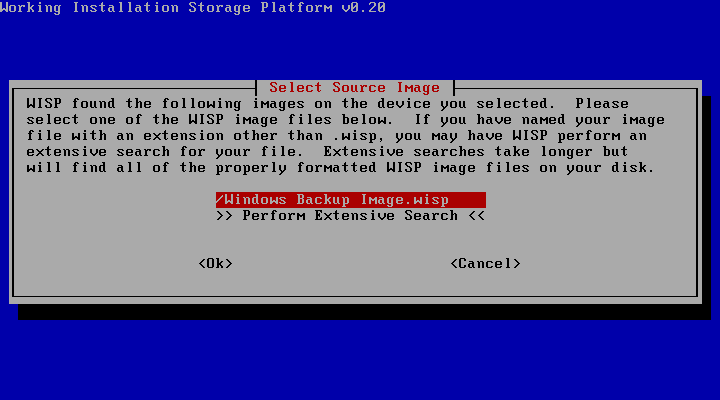
Select the image file that you wish to restore. The extensive search option is intended to locate WISP image files that have not been named with the ".wisp" extension; it takes longer but is still capable of locating those files.
 |
Potential Pitfall | |
If there are no WISP image files on the partition (or those image files are improperly named), you may be prompted with the following message.
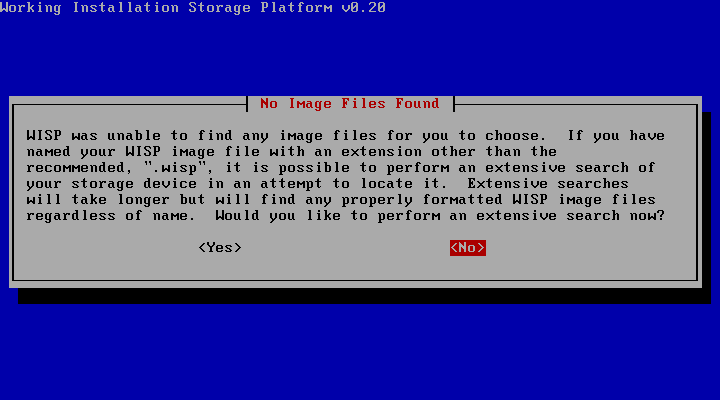
If you receive this message, it is most likely that no WISP image is actually stored on the partition you selected. If you are certain that there is a WISP image file on the partition, it may have an improperly named extension (not ".wisp"). In that case, an extensive search will find it. Otherwise, press escape to select another partition.
You've now provided WISP with the image file you want to use. Next, you may proceed to the instructions on selecting a target partition.
Restoring from Optical Media
Once you have selected "Readable Disc" from the source media type menu, WISP will ask which media reading drive you wish to use. Insert the first disc of the image series and select the image reader in which you placed it.

If WISP itself burned the image to optical disc, it will find the image file on the disc and you will be ready to instruct it as to where you would like the image restored. Proceed to the section on selecting a target partition for instructions.
Restoring from a Networked Computer
When you select "Network Storage" from the source media type menu, WISP will ask you which type of networking protocol you wish to use to reach the other computer. Although this example deals with using Windows file sharing (SMB), it is also possible to use SSH to retrieve the image file.
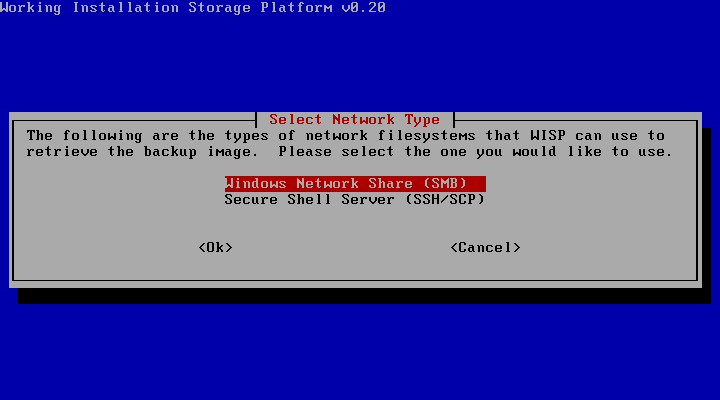
After selecting "Windows Network Share", the following dialog will appear asking you for the SMB path to the share you wish to use.
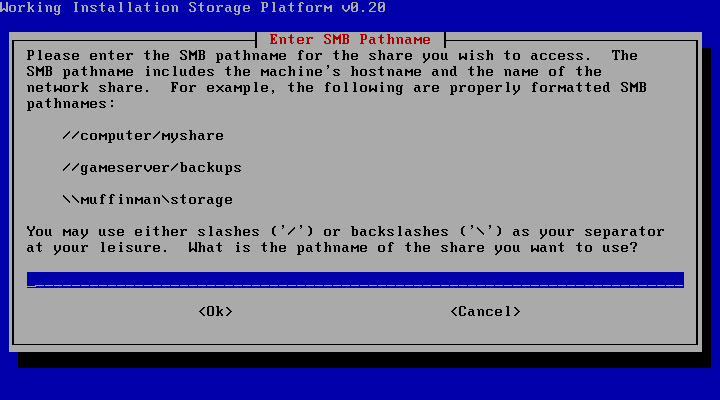
You will need to provide the path to your SMB share. An SMB share's path is written as "\hostname\share". The hostname can be either the computer's IP address (such as 192.168.1.2) or the computer's name (such as Antelope or FamilyComp). The share itself is the name of the share as it was set up on the computer in question.
Note that WISP is not asking for a path beyond the sharename. Do not specify a subfolder to the shared folder, such as "\192.168.1.2\datashare ewstuff\wisp\"; you will be given an opportunity to browse the share's contents later.
Once you have provided the SMB share's path, WISP will ask you for your username:
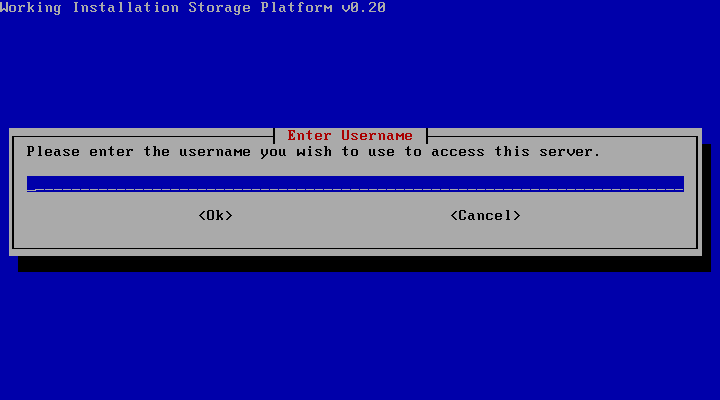
This should be the username you would use to connect to the share in question. Once you have provided that, you will be prompted for your password at the very bottom of the screen.
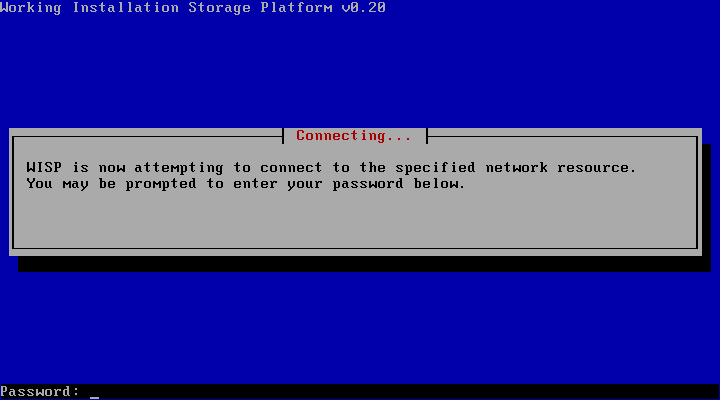
In order to protect your password, it will not be displayed on the screen in any form (not even as a series of asterisk characters, such as "*********"). If you make a mistake while typing your password, press backspace many times (at least once for each character in the password) and then try again.
You will then be asked whether or not you wish WISP to search for WISP image files. If you wish to locate the file yourself, you will be presented with a file chooser dialog similar to the one shown on the Create an Image page under the Writing to Hard Disk section. If you allow WISP to search for files, you will see a dialog similar to the one pictured below:
Select the image file that you wish to restore. The extensive search option is intended to locate WISP image files that have not been named with the ".wisp" extension; it takes longer but is still capable of locating those files.
|
Potential Pitfall | |
If there are no WISP image files on the share (or those image files are improperly named), you may be prompted with the following message.
If you receive this message, it is most likely that no WISP image is actually stored on the share you selected. If you are certain that there is a WISP image file on the share, it may have an improperly named extension (not ".wisp"). In that case, an extensive search will find it. Otherwise, press escape to select another share.
You've now provided WISP with the image file you want to use. Next, you may proceed to the instructions on selecting a target partition.
Manually Preparing Source Media
In the event that none of the above methods are acceptable, WISP provides a manual source setup option. If you select "Manual" from the source media menu, WISP will provide you with a bash shell to allow you to execute a series of commands in order to prepare the media yourself. The bash shell is nothing like the Windows command prompt and does not accept the same commands; only use manual setup if you need to do so and if you are already familiar with bash and Linux.
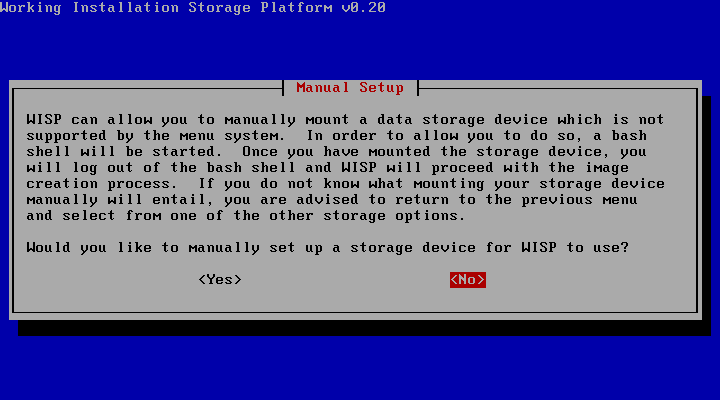
Once you have finished setting up the source media, press Ctrl-D to log out of the shell and allow WISP to continue.
Selecting a Target Partition
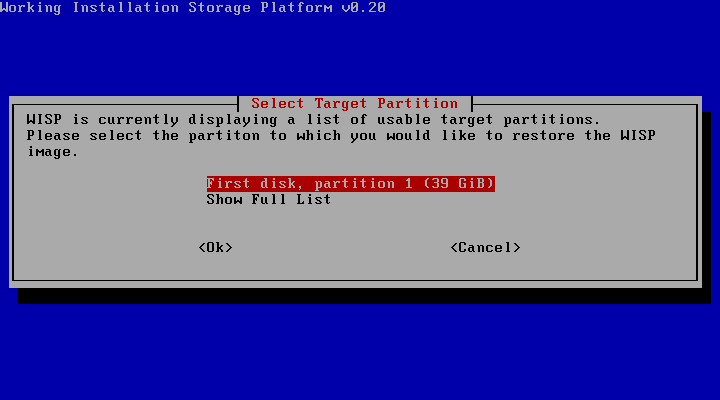
Now that you have informed WISP where it can find your image file, you will be prompted to select the target partition for the restoration.
|
Potential Pitfall | |
It is very important to note that the restoration process will destroy the entire contents of the partition you select. The purpose of WISP is to restore the Windows installation to the exact state in which it was when you created the image; thus, any files you have saved on your Windows drive (such as in My Documents and so forth) will be destroyed when you restore Windows to that state. Make sure you have backed up any important data before proceeding!
It is also important to stress that you select the right partition in this section. Usually, this is not difficult; most computers have only one or at most two partitions. However, if you have a large number of hard drives or several different partitions on your computer, make sure that the partition to which you are restoring is the correct one.
Select the partition to which you would like to restore the contents of your WISP image here. If your image contains a bootloader image, WISP will now ask you if you want to restore it.
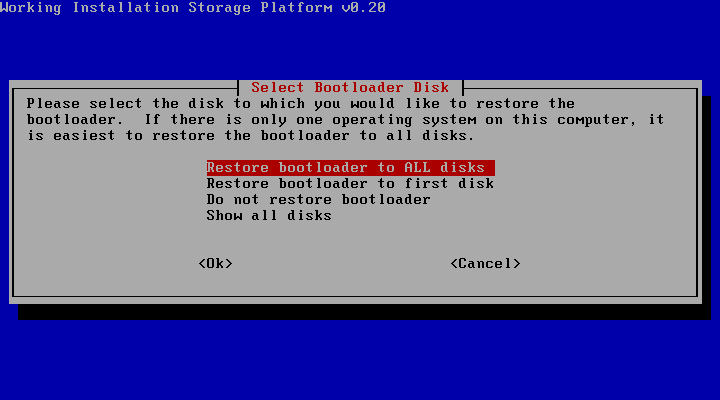
Usually, it is advisable to pick the first option. Your computer will require the bootloader to start properly and, unless you have multiple operating systems installed on your computer, the only bootloader that matters is the one the BIOS uses to boot. In WISP, this drive is known as the "First Disk"; however, to be sure, you can restore the bootloader to every hard disk. This will not interfere with the partitions on those hard disks or any of the files stored on them.
If you are running a computer with multiple operating systems, it is possible that you are using a bootloader other than the one used by Windows. In that case, you will probably not want to restore the bootloader and instead configure your existing one to boot the Windows partition after restoration is complete.
Once you have made your selection, WISP will present you with a confirmation dialog.
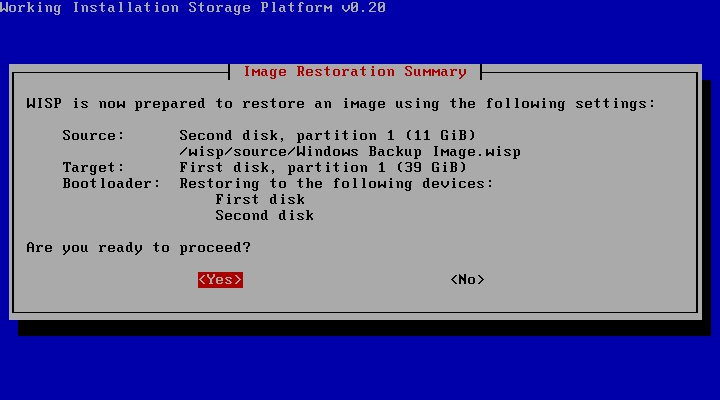
The specific contents of this dialog may be different depending on your choices and your computer's configuration. Again, it is important to note that all of the contents of the partition will be replaced with the contents of the WISP image, so make sure you have backed up all of your important data before proceeding!
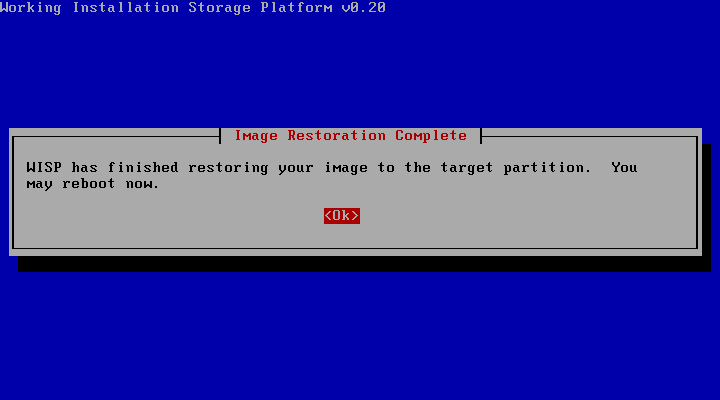
You will then be presented with the restoration progress dialog.
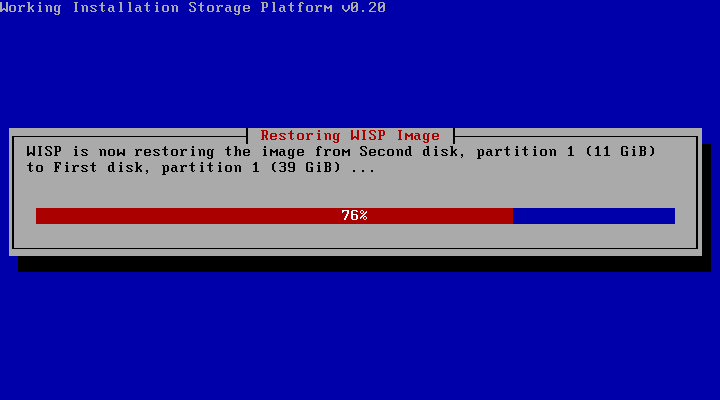
If you are using optical media, WISP will occasionally request the next disc in the image sequence. Once the restoration is finished, you may reboot into your newly restored Windows system!
Finally, when you initially reboot into your Windows system, you may see a screen similar to the following one:
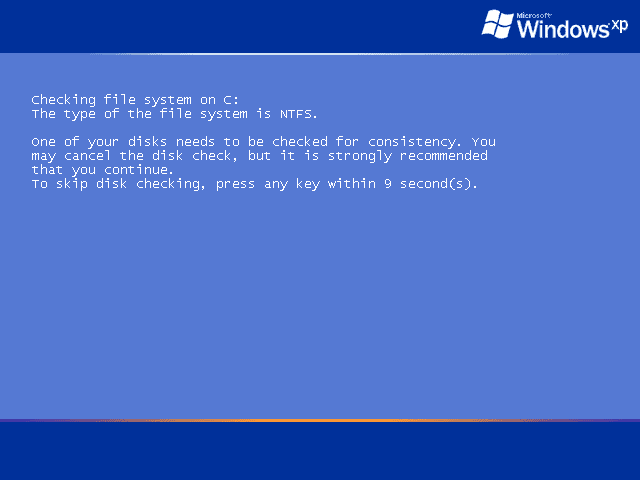
This is because, after restoring your Windows installation, WISP flagged the partition as dirty. This is a safety measure to ensure that your new filesystem is properly constructed; Windows will check it for validity and then mark it as clean. Simply wait for your computer to reboot again and the login screen will appear. You may now use Windows normally.
Content copyright Zachary Palmer 2007. All rights reserved.
This page is ad-free. If you see an advertisement on this page, please contact me at zep01@bahj.com.


